Hi All,
After granting an extension for Assignment 2 to the 6th of June I mistakenly told some students last week that Assignment 3 (the Tutorial and Reflection) was due on the same day. It isn't; Assignment 3 is due on the 13th ... this gives a week after submitting Assignment 2 so you can make a good job of it.
So, in short:
Assignment 2 due by 11:59pm Tuesday 6th of June. (Following a two week extension).
Assignment 3 due by 11:59pm Tuesday 13th of June. (Original due date from the course outline).
Very sorry for any confusion.
Regards
Russell
Monday, June 5, 2017
Monday, May 29, 2017
Assignment 3: Original tutorial and reflection.
Hi All,
Assignment 3 kicks off today!
From the course outline you'll recall the description below:
Step 1: The Original Tutorial
Inspired by one of the creations you have already made during the course prepare a tutorial that would enable a third party to more efficiently create a similar outcome.
Advice: As the first step is similar to last year you might like to look at the work of Anabel Kim, James Hong and Patricia David to see whats involved in preparing a good tutorial.
Step 2: Reflection
Situate the shape you have chosen in step 1 in a disciplinary spectrum of related shapes. Write one sentence to justify, expand or otherwise enrich each selection.
Advice: As step 2 is new this year I've created two examples below. In the first one I imagined my discipline to be Land Speed Racing, in the second I imagined it to be Art/Architecture. For you it will be Interior Architecture, Landscape Architecture, Construction, Industrial Design, Architecture, Computational Design or Planning; whatever degree you are enrolled in.


Russell
Tuesday, May 16, 2017
EXTENSION! Assignment two due 6th of June.
Hi All,
As discussed in class yesterday I'd like to confirm an extension for assignment two.
Initially we discussed a one week extension, but looking at the class schedule again it seems reasonable to extend it a little further as the last assignment is quite generous with its schedule.
So the new due date for assignment two is Tuesday the 6th of June by 11:59pm.
This leaves one full week to complete assignment three, which is quite manageable if you collect the required documentation as you go through the next few weeks.
You can leave any questions in the comments below, contact me via email, or catch me in the workshop next week.
Regards
Russell
Monday, May 1, 2017
Materials Payment
Hi All,
Sorry for the delay on this, but we now have a way for you to pay for the materials you've been using in class.
Follow this link: https://webpay.fin.unsw.edu.au/OneStopWeb/BEIL0014DigitalMakingMaterials
Please make payment by the 12th of May so the workshop doesn't run out of materials for us.
Regards
Russell
Sunday, April 23, 2017
123d Make has been replaced!
Hi All,
As some of you have discovered (thanks Joel!) 123d Make is no more. Autodesk has consolidated all of the 123d products into its other software. It's a tough move for many users to understand as the 123d apps were all very well received and had built up a large community of users.
All is not lost however; scroll down on this page to see what alternatives Autodesk suggests

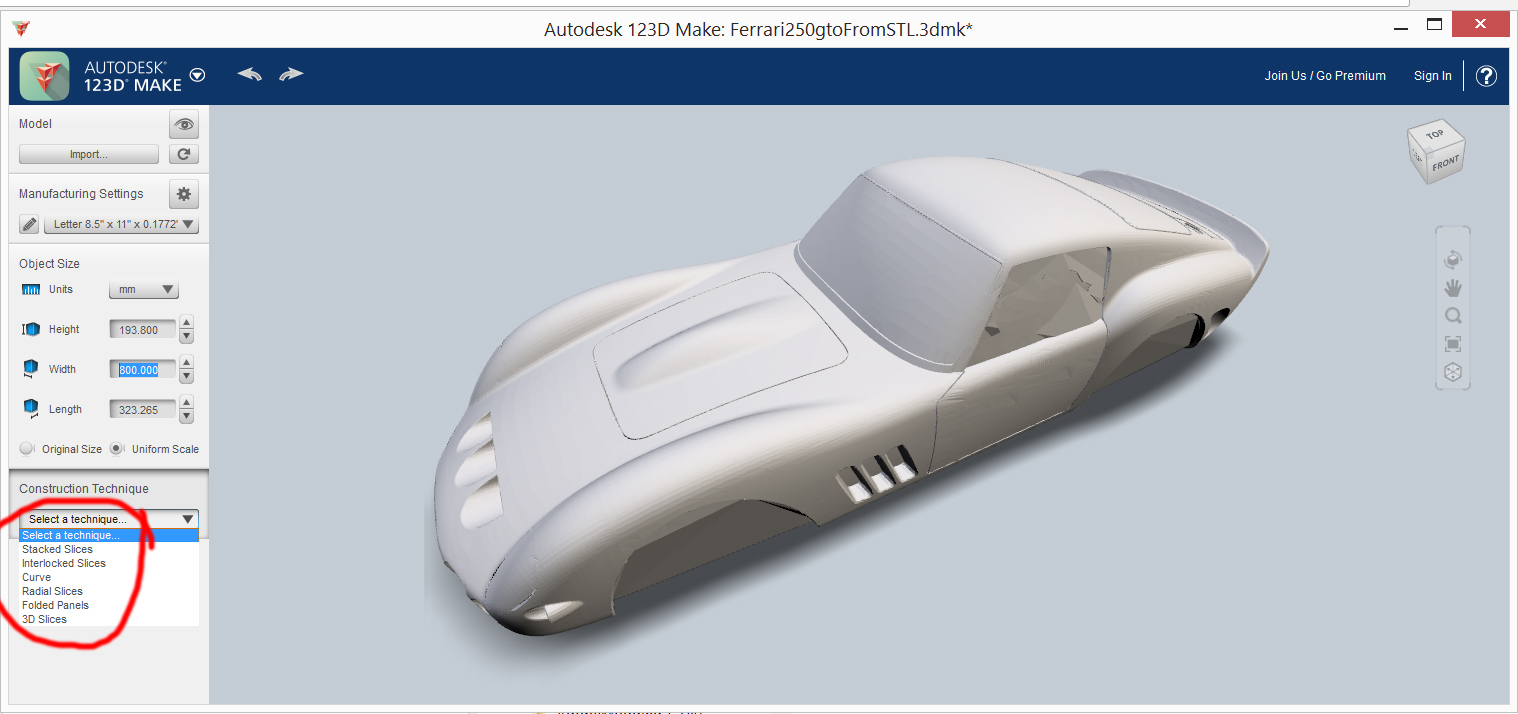
You'll see an app called Slicer for Fusion 360.
I downloaded it from here and imported the same Ferrari 250 GTO model (in STL format) that I imported into 123d Make. After a short wait of about 3 minutes (keep in mind my machine is pretty fast, yours may take longer to import) it imported without any problems. What was surprising was how similar Slicer looks to 123d Make, and even more surprising ... Slicer used my 123d make custom page sizes ... obviously Autodesk is trying to make the transition easy.
So, to summarize:
1. Download Slicer from here
2. Install it using the default settings
3. Import this stl model of the Ferrari 250 GTO (be patient, it may take a while)
4. Adjust the size uniformly so that the model fits within the BERG's
5. Experiment with construction techniques
6. Cut on either the large or small laser cutters in the Digi Fab Lab
Finally, I used Slicer in stand alone mode but it is intended to be used as a plugin to Fusion 360. I haven't used Fusion 360 yet, but friends of mine in industry rate it very highly ... if you are looking to up your 3d modeling game, or try an alternative from Solidworks or Sketchup it seems well worth a try.
Regards
Russell
As some of you have discovered (thanks Joel!) 123d Make is no more. Autodesk has consolidated all of the 123d products into its other software. It's a tough move for many users to understand as the 123d apps were all very well received and had built up a large community of users.
All is not lost however; scroll down on this page to see what alternatives Autodesk suggests

You'll see an app called Slicer for Fusion 360.
I downloaded it from here and imported the same Ferrari 250 GTO model (in STL format) that I imported into 123d Make. After a short wait of about 3 minutes (keep in mind my machine is pretty fast, yours may take longer to import) it imported without any problems. What was surprising was how similar Slicer looks to 123d Make, and even more surprising ... Slicer used my 123d make custom page sizes ... obviously Autodesk is trying to make the transition easy.
So, to summarize:
1. Download Slicer from here
2. Install it using the default settings
3. Import this stl model of the Ferrari 250 GTO (be patient, it may take a while)
4. Adjust the size uniformly so that the model fits within the BERG's
5. Experiment with construction techniques
6. Cut on either the large or small laser cutters in the Digi Fab Lab
Finally, I used Slicer in stand alone mode but it is intended to be used as a plugin to Fusion 360. I haven't used Fusion 360 yet, but friends of mine in industry rate it very highly ... if you are looking to up your 3d modeling game, or try an alternative from Solidworks or Sketchup it seems well worth a try.
Regards
Russell
Sunday, April 9, 2017
Project two begins this week!
Hi All,
Just a friendly reminder that Assignment Two begins this week.
In addition to finishing off any loose ends regarding the Tray, Torus, Bowl and Blister (refer again to the marking schedule at the back of the course outline) there are three tasks to achieve this week:
1. Form groups of 6
For everyone (except for the IDES students who have the class clash) ensure that your groups are as dissimilar as possible; in other words, form the groups of 6 by combining 3 pairs of students who have worked together on the trays and blisters. Daniel and Eliot will help you to do this.
2. Download and install 123dMake
3. Download this model of a Ferrari 250gto and experiment with different ways of configuring the software to create a template for shaping the aluminium panels.

Before the beginning of the next class (May 2nd ) work together as a team to cut and assemble the template.
(As a team you'll be creating the full surface of the Ferrari; with each student picking a different part to shape ... so after some negotiation there shouldn't be any double ups or gaps).
IMPORTANT!!!!! Scale your Ferrari to fit inside the BERG (Built Environment Roving Gallery) display cases. You'll find the BERG's in public places around the faculty (they are designed to move, so you might need to go hunting for them); they have white bases and clear acrylic covers and are about 1.2 meters tall ... Last time I saw them they were displaying 3d Prints from CODE courses. Leave about 50mm space between the front and back of the finished model and the display case.
The Design Lab has MDF especially for this task. I imagine most of you will use the laser cutter and 3mm MDF, but some might like to try the CNC machine again (work with Ed to explore that possibility).
Regards
Russell
Just a friendly reminder that Assignment Two begins this week.
In addition to finishing off any loose ends regarding the Tray, Torus, Bowl and Blister (refer again to the marking schedule at the back of the course outline) there are three tasks to achieve this week:
1. Form groups of 6
For everyone (except for the IDES students who have the class clash) ensure that your groups are as dissimilar as possible; in other words, form the groups of 6 by combining 3 pairs of students who have worked together on the trays and blisters. Daniel and Eliot will help you to do this.
2. Download and install 123dMake
3. Download this model of a Ferrari 250gto and experiment with different ways of configuring the software to create a template for shaping the aluminium panels.
Before the beginning of the next class (May 2nd ) work together as a team to cut and assemble the template.
(As a team you'll be creating the full surface of the Ferrari; with each student picking a different part to shape ... so after some negotiation there shouldn't be any double ups or gaps).
IMPORTANT!!!!! Scale your Ferrari to fit inside the BERG (Built Environment Roving Gallery) display cases. You'll find the BERG's in public places around the faculty (they are designed to move, so you might need to go hunting for them); they have white bases and clear acrylic covers and are about 1.2 meters tall ... Last time I saw them they were displaying 3d Prints from CODE courses. Leave about 50mm space between the front and back of the finished model and the display case.
The Design Lab has MDF especially for this task. I imagine most of you will use the laser cutter and 3mm MDF, but some might like to try the CNC machine again (work with Ed to explore that possibility).
Regards
Russell
Sunday, April 2, 2017
The Blister!
Hi All,
For tomorrows class you might want to take a look at this demo video:
You'll see why we will be using a thick sheet of MDF on both the the top and the bottom of the work piece (so we don't get the wrinkles he has). In his case the wrinkled part is going to be cut off so it wasn't a problem; so keep that in mind if you'll be doing the same in the future. This guy has a lot of videos, well worth watching.
The guy below uses a modified air powered rivet gun to speed up the process.
And finally, something that's off topic but a bit of fun; Hydroforming is a serious technique in Industrial Design, but here Colin Furze shows you how you can do it at home ...
Regards
Russell
Subscribe to:
Posts (Atom)